 Save to Pinterest
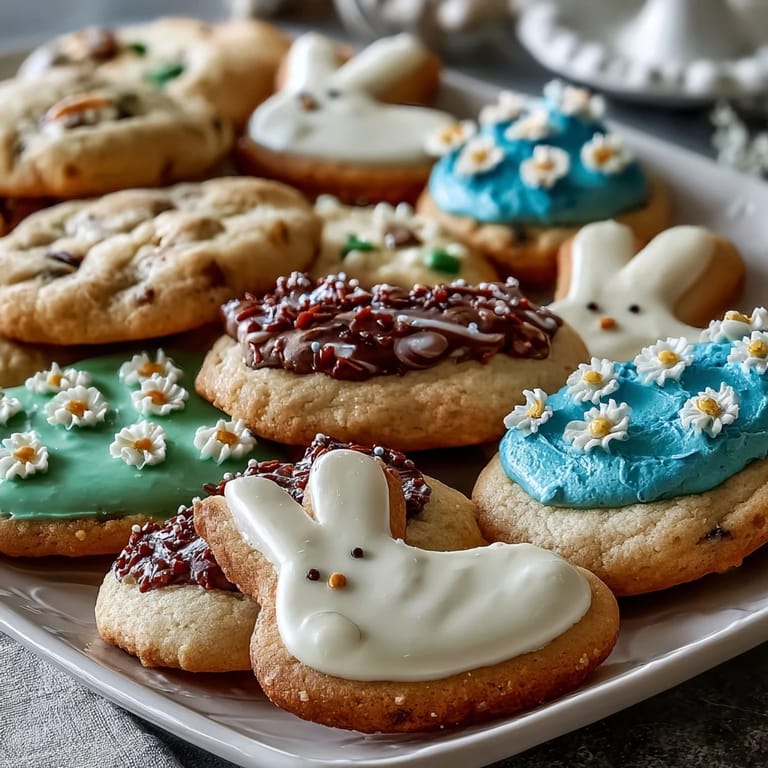
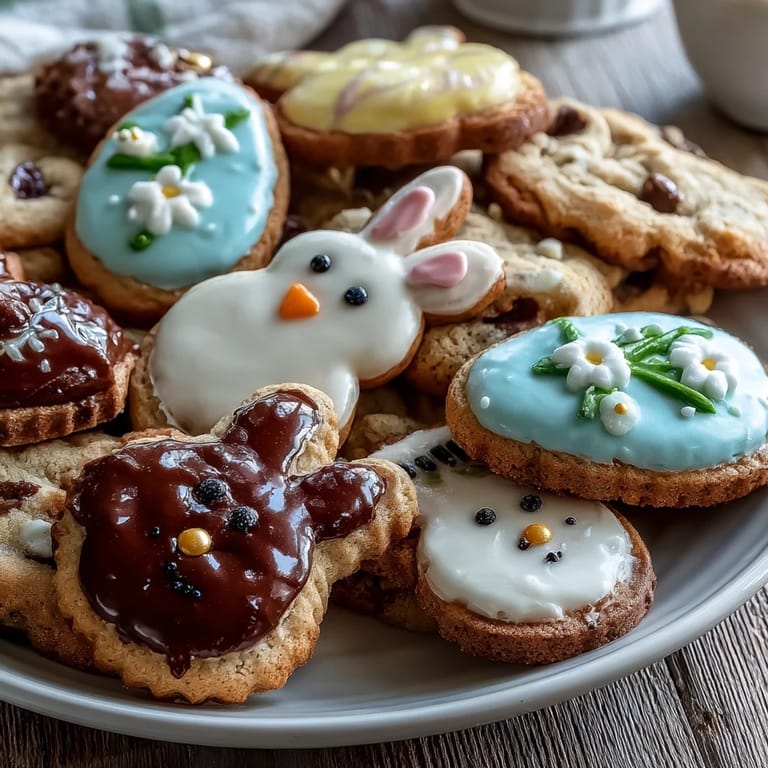
 My sister called me three days before Easter in a mild panic—she'd promised her kids homemade cookies shaped like bunnies and chicks, but had zero time to bake. I found myself at my kitchen counter at 10 PM, flour everywhere, mixing butter and sugar while humming along to whatever was on the radio. By the time I'd piped pastel icing onto dozens of cookies, my hands were covered in pale pink and soft yellow, and I realized this wasn't just about saving the day—it was about creating something beautiful that would make their holiday special.
I'll never forget pulling that first batch from the oven and watching my neighbor peek over the fence—she caught the aroma of vanilla and butter wafting across the yard and invited herself in. We spent the next hour decorating cookies together, her with a steady hand and me laughing as I tried to make a bunny that didn't look like a blob. By the time we finished, we'd made twice as many as I'd planned, and she went home with a box wrapped in tissue paper, grinning like she'd won the lottery.
Ingredients
- All-purpose flour (2 1/2 cups): The foundation that keeps these cookies tender rather than cakey—don't sift it unless you want them denser than intended.
- Baking powder (1/2 teaspoon): Just enough lift to make them pillowy without turning them into cake.
- Salt (1/4 teaspoon): A pinch that makes the butter sing and balances the sweetness.
- Unsalted butter (3/4 cup): Room temperature is non-negotiable here—cold butter won't cream properly and you'll end up with tough cookies.
- Granulated sugar (1 cup): The sweetness backbone, creamed with butter until it looks like pale sand.
- Egg (1 large): Binds everything and adds richness; make sure it's at room temperature.
- Vanilla extract (2 teaspoons): Pure extract makes a noticeable difference—don't skip it or use imitation.
- Milk (1 tablespoon): A tiny amount that helps bring the dough together without making it wet.
- Powdered sugar (3 cups): Must be sifted or you'll have lumps in your icing that ruin the smooth finish.
- Meringue powder (2 tablespoons): The secret to royal icing that sets hard—it stabilizes the egg whites and adds structure.
- Warm water (5-6 tablespoons): Start with less and add gradually; you're looking for stiff peaks, not soup.
- Gel food coloring in pastels: Gel holds color better than liquid and won't thin out your icing like water-based dyes do.
Tired of Takeout? 🥡
Get 10 meals you can make faster than delivery arrives. Seriously.
One email. No spam. Unsubscribe anytime.
Instructions
- Whisk your dry ingredients together:
- In a medium bowl, combine flour, baking powder, and salt. Set this aside—keeping them separate until now means your leavening won't activate too early.
- Cream butter and sugar until fluffy:
- In a large bowl with an electric mixer, beat the softened butter and granulated sugar for 2–3 minutes until it looks pale and cloud-like. This is where air gets trapped, making your cookies tender.
- Add the egg and vanilla:
- Mix in one egg and the vanilla extract until well combined. Scrape down the bowl because any streaks of butter will mean uneven cookies.
- Bring the dough together gently:
- On low speed, gradually add the dry ingredients until just combined, then add milk and mix until the dough just comes together. Overmixing at this stage develops gluten and toughens everything.
- Chill the dough:
- Divide dough in half, flatten into discs, wrap in plastic, and refrigerate for at least 1 hour. Cold dough is easier to roll and cut without spreading.
- Prepare your oven and workspace:
- Preheat oven to 350°F (175°C) and line baking sheets with parchment paper. This prevents sticking and ensures even browning on the bottom.
- Roll and cut with confidence:
- On a lightly floured surface, roll dough to 1/4-inch thickness and cut into Easter shapes. Work with one disc at a time and keep the other chilled so it doesn't get soft.
- Space cookies properly on the sheet:
- Place cookies 1 inch apart so they can bake evenly without touching each other.
- Bake until edges just turn golden:
- Bake 8–10 minutes—they should look barely set in the center. They'll continue cooking on the hot sheet for a few minutes after you pull them out.
- Cool strategically:
- Let cookies rest on the baking sheet for 5 minutes (they firm up), then transfer to wire racks to cool completely. This prevents them from cracking when you handle them later.
- Make your royal icing base:
- In a large bowl, combine sifted powdered sugar and meringue powder. Add water gradually, beating on low until smooth, then on high for 3–4 minutes until stiff peaks form—this is crucial for clean decorating.
- Color your icing with restraint:
- Divide icing among bowls and add pastel gel coloring one tiny drop at a time. Gel is potent, and you want soft, springtime shades, not neon.
- Transfer to piping bags and decorate:
- Spoon icing into piping bags and decorate cooled cookies however you'd like. If you want a smoother finish, thin some icing with a drop of water for flooding between piped outlines.
- Let the magic set:
- Allow icing to set completely—overnight is ideal—before stacking or storing. This ensures they hold up without smudging.
 Save to Pinterest
 Easter morning came around and my sister texted a photo of her kids biting into the bunny-shaped cookies, their faces covered in pastel icing crumbs, pure joy in their eyes. That's when I understood—these weren't just cookies, they were edible memories, the kind of thing kids remember about being loved.
Why These Cookies Outshine Store-Bought
The butter content in homemade dough is exactly what makes them melt on your tongue—store-bought versions rely on shelf stability over texture. I've sat with a homemade cookie in one hand and a bakery version in the other, and there's simply no comparison. The real vanilla, the actual cream in the butter, the way they crumble slightly when you bite—all of that happens because you made them with intention, not spreadsheet economics.
The Decorating Part Is Actually Therapeutic
There's something about piping icing onto cookies that quiets your mind in a way scrolling through your phone never will. You're focused but not stressed, creative but not expected to be perfect, and by the time you finish your first batch, you've found your rhythm. My hands know what to do now without my brain overthinking it, and that's when decorating stops feeling like work and starts feeling like play.
Storage and Serving Wisdom
These cookies keep beautifully in an airtight container for up to a week, and the icing actually hardens more as they sit, making them sturdier for gifting. I've learned that they pair perfectly with tea—specifically Earl Grey, where the floral notes echo the pastel colors and the slight bitterness cuts through the sweetness. A cup of tea and one of these cookies has become my quiet morning ritual come springtime.
- Layer cookies between parchment paper in your storage container so the icing doesn't stick to itself.
- If icing cracks when you stack them, it means they needed another day to fully set.
- These freeze beautifully for up to three months if you need to plan ahead for celebrations.
 Save to Pinterest
 These cookies have become my Easter tradition, the thing people ask me to bring, the small gesture that somehow matters more than it should. Every time I make them, I'm adding another layer to a family memory.
Recipe FAQs
- → How do I achieve soft sugar cookies?
Chilling the dough before baking and avoiding over-baking helps keep the cookies tender and soft.
- → What is royal icing made of?
It combines powdered sugar, meringue powder, and water, whipped until stiff peaks form for smooth, pipeable consistency.
- → How can I get vibrant pastel colors in the icing?
Use gel food coloring in pastel shades and add small amounts gradually for delicate, bright hues.
- → Can I store decorated cookies?
Yes, store in an airtight container at room temperature for up to one week to maintain freshness and decoration.
- → What tools are recommended for decorating?
Use piping bags or squeeze bottles for precise icing application, plus Easter-shaped cutters for festive designs.