 Save to Pinterest
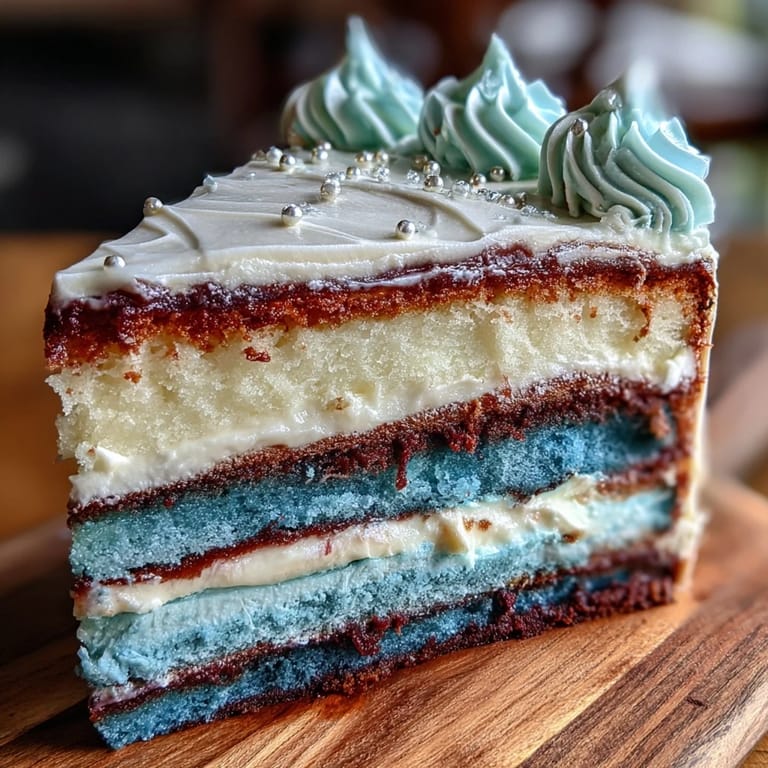
 My sister stood in the kitchen three days before her graduation, staring at a blank Pinterest board and asking if I could make her something that felt as special as the moment itself. She wanted layers, colors, something that would photograph well and taste even better. I'd never attempted a four-layer ombre cake before, but watching her face light up when I suggested graduated color tiers made it impossible to say no. That cake became more than dessert, it became the centerpiece of her celebration, and somehow baking it felt like I was honoring the milestone right alongside her.
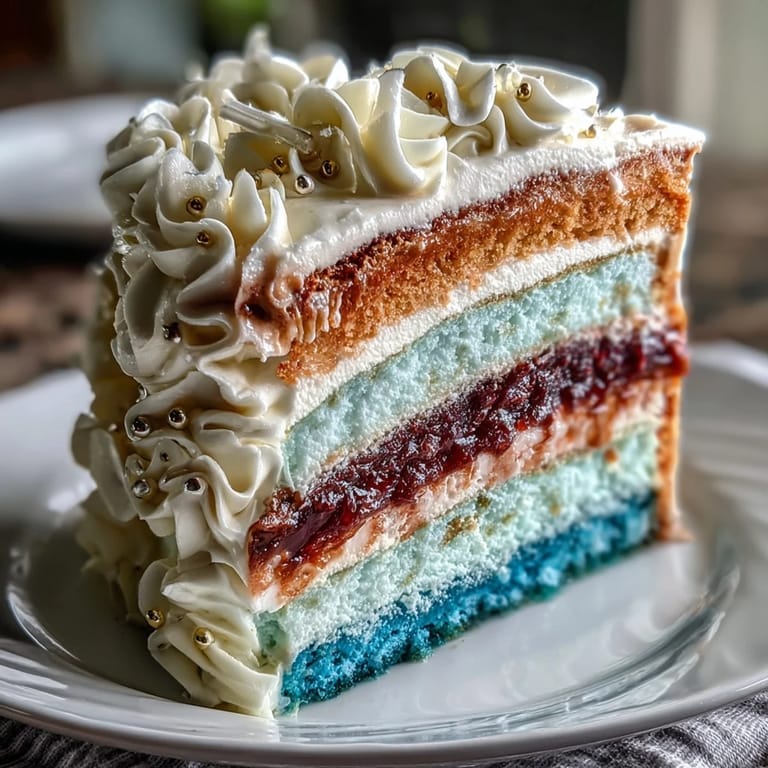
I remember pulling the first cooled layer out of the pan and thinking, this is just a regular cake, nothing special yet. But then I started dividing the batter and adding those drops of gel food coloring, watching the bowls transform from pale cream to soft pastels to rich, jewel-toned shades. By the time all four layers were stacked and I was blending that buttercream between colors, the whole thing had shifted from just another dessert into something that felt like edible art. My sister's friends kept asking for the recipe, but really they wanted to know how to capture that feeling of celebration on a plate.
Ingredients
- All-purpose flour (3 1/4 cups): Measure by spooning and leveling, not scooping straight from the bag, because that extra half cup sneaks in without you noticing and suddenly your cake is dense and heavy.
- Baking powder (2 1/2 tsp): Fresh is crucial here, and I learned this the hard way when a cake refused to rise; replace it every six months if you bake regularly.
- Salt (1/2 tsp): Don't skip this, it actually brightens the vanilla and makes the whole cake taste more like itself.
- Unsalted butter (1 cup, softened): Soft butter creams with sugar faster and incorporates air more easily, which gives you that tender crumb everyone wants.
- Granulated sugar (2 cups): The beating-sugar-with-butter phase is where your cake gets its lift, so give it at least three full minutes until it looks pale and fluffy.
- Large eggs (4, room temperature): Cold eggs won't incorporate smoothly and can curdle your batter; let them sit on the counter for thirty minutes beforehand.
- Vanilla extract (1 tbsp): Real vanilla makes a noticeable difference, especially in a simple cake where it's one of the main flavor players.
- Whole milk (1 1/4 cups, room temperature): Same rule as eggs, cold milk will shock the batter and separate everything you just worked to emulsify.
- Gel food coloring: Gel is more concentrated than liquid, so you get vibrant colors without thinning your batter and throwing off the moisture balance.
- Egg whites (6, for buttercream): Pasteurized eggs are safer for a cooked buttercream, but heating to 160°F ensures any risk is eliminated.
- Granulated sugar (1 1/2 cups, for buttercream): This dissolves into those egg whites and creates that glossy, stable meringue that holds peaks.
- Unsalted butter (1 1/2 cups, cubed and softened): Cubing it first means it incorporates faster into the meringue without breaking the mixture.
- Vanilla extract (2 tsp, for buttercream): A touch of vanilla in the frosting balances the sweetness and ties the whole cake together.
Tired of Takeout? 🥡
Get 10 meals you can make faster than delivery arrives. Seriously.
One email. No spam. Unsubscribe anytime.
Instructions
- Prep and heat your oven:
- Set your oven to 350°F and grease those four pans thoroughly, then line the bottoms with parchment; this is the only way you'll get layers that slide out cleanly. If you're missing a fourth pan, you can bake two sets back-to-back, though timing becomes trickier.
- Mix your dry ingredients:
- Whisk flour, baking powder, and salt in a medium bowl and set aside; this prevents lumps and distributes the leavening evenly. Sifting sounds fancy but whisking does the same job if you're efficient about it.
- Cream butter and sugar until pale:
- Beat these together for at least three minutes until the mixture looks like fluffy clouds and has lightened noticeably in color. This step is where you're aerating the batter, which directly translates to a tender, springy crumb.
- Add eggs one at a time:
- After each egg, mix for about thirty seconds before adding the next, making sure everything is fully incorporated and the mixture doesn't look curdled. If it does look split, don't panic, the flour will bring it back together.
- Mix in vanilla extract:
- One tablespoon goes in after the eggs, and you'll smell it immediately, which is always a good sign. Make sure it's distributed evenly before moving forward.
- Alternate flour and milk:
- Start with flour, then milk, then flour again, ending on flour to keep the batter stable; mix just until combined each time to avoid overdeveloping gluten. If you overmix, your cake will be tough, so stop as soon as you don't see dry streaks anymore.
- Divide batter into four bowls:
- Use a kitchen scale for even portions if you have one, otherwise estimate as carefully as you can; each bowl gets its own shade of gel coloring, from lightest to darkest. Stir gently until the color is uniform but don't overwork it.
- Pour into pans and smooth:
- Use an offset spatula to level the tops so layers bake evenly and you don't end up with domed cakes that roll off each other. Leave a little room at the edges because the batter will spread slightly as it bakes.
- Bake until a toothpick comes out clean:
- At 22-25 minutes, insert a toothpick into the center of the middle pan; it should come out with just a few moist crumbs, not wet batter. Don't open the oven door before twenty minutes because the cakes are still setting.
- Cool in pans, then turn out:
- Let them rest for ten minutes before flipping onto wire racks so they release cleanly but don't crack from thermal shock. Run a thin knife around the edges first if you're nervous about them sticking.
- Prepare the Swiss meringue:
- Whisk egg whites and sugar together over simmering water, stirring constantly until you hit 160°F and the sugar feels completely dissolved against the bowl. This takes about eight to ten minutes and feels endless, but it's essential for safety and stability.
- Whip until cool and glossy:
- Once the mixture reaches the mixer bowl, whip on high speed for about ten minutes until stiff peaks form and the bowl has cooled to room temperature. You're essentially beating air into cooked egg whites, which creates that cloud-like texture.
- Add butter gradually:
- Drop in a few cubes at a time and let them fully incorporate before adding more; if the mixture looks greasy or breaks, you've added butter too fast, so slow down and keep mixing. It will look weird and separated for a moment before coming back together, which is completely normal.
- Tint portions of buttercream:
- Divide some buttercream into bowls and tint each portion to match or complement your cake layers, creating a palette that feels intentional. You can also leave some white for blending, which softens the ombre effect and looks more sophisticated.
- Level and stack layers:
- If your cake layers are domed, use a serrated knife to trim them level so they stack without shifting; place the darkest layer on your cake stand and spread it with buttercream. Continue stacking from darkest to lightest, spreading frosting between each layer generously.
- Apply a crumb coat:
- Spread a thin, even layer of buttercream over the entire cake and chill it for twenty minutes; this seals in crumbs so your final frosting looks polished. You'll see why bakers swear by this step the moment you frost over it.
- Final frosting and blending:
- Apply your final layer of buttercream, using an offset spatula or bench scraper to smooth it; blend colors at the seams for that ombre effect or create distinct color bands. Step back often to see how it looks from a distance, because perspective changes everything.
- Decorate and chill:
- Add edible pearls, a graduation topper, or piped details while the frosting is still soft enough to hold them; chill until set, then bring to room temperature about an hour before serving. Room temperature frosting tastes infinitely better than cold frosting, and the cake's crumb will be tender instead of dense.
 Save to Pinterest
 On graduation day, my sister cut into that cake in front of fifty people at her backyard party, and the room actually went quiet. All four layers of color showed at once, and for a moment, that cake wasn't just dessert, it was proof that you can create something beautiful and meaningful with flour, eggs, and intention. She still texts me photos of cakes she sees that remind her of that day, and I know I'd make it again in a heartbeat for her, or for anyone else stepping into whatever comes next.
Why Gel Food Coloring Matters
The first time I tried to make an ombre cake, I used liquid food coloring because that's what I had, and the batter absorbed all that moisture like a sponge. The cake came out dense and slightly gummy, and the colors weren't even vibrant because the liquid had diluted the mixture too much. Gel coloring is concentrated, so you need just a few drops to achieve rich, bold hues without changing the cake's structure or how it bakes. Now I keep a set of gel colors in my pantry specifically for cakes, and I've never looked back.
The Science Behind Swiss Meringue Buttercream
Swiss meringue buttercream intimidates people until they understand what's happening: you're cooking egg whites to a safe temperature, then whipping them into fluffy peaks, then enriching them with butter to create something stable enough to hold those color gradients. The heat step makes it safer than American buttercream, and the whipping stage incorporates air that keeps the frosting light instead of dense and greasy. This buttercream holds piped details sharply, pipes beautifully in different colors without muddying them together, and tastes less aggressively sweet than variations made with just powdered sugar. Once you taste it, you understand why it's the choice for celebration cakes.
Perfecting Your Ombre Technique
Creating that smooth color gradient is really about thinking in layers of lightness and darkness, and being intentional about where you place each one. Darkest on the bottom grounds the cake visually, and as you stack toward the top, each lighter shade draws the eye upward, which feels elegant and intentional. If you have white buttercream, using it at the seams and blending colors slightly softens the transition and looks more sophisticated than a stark jump from one color to another. You can also crumb-coat in white, then frost only the outside in graduating color bands, which is less daunting if four fully tinted bowl feels overwhelming. One more thought, have an extra piping bag on hand so you can switch colors without washing between each one.
- Chill each layer of frosting for five minutes between colors so they don't muddy together while you're working.
- Use an offset spatula dipped in warm water and wiped dry for smoother, more controlled frosting application.
- Take photos from different angles before serving, because this cake is as beautiful to document as it is to eat.
 Save to Pinterest
 This cake has taught me that celebrations deserve care, and that baking something beautiful for someone you love is its own kind of love language. Make this for a graduation, an engagement, a promotion, or just because someone needs to feel special, and watch what happens.
Recipe FAQs
- → How do I achieve the ombre color effect in the layers?
Divide the batter into separate bowls and add increasing amounts of gel food coloring to each, creating a gradient from light to dark.
- → What is the best way to make Swiss meringue buttercream?
Heat egg whites and sugar over simmering water until sugar dissolves, then whip until stiff peaks form before gradually adding softened butter.
- → Can I prepare this cake in advance?
Yes, layers and buttercream can be made ahead and chilled. Assemble and decorate closer to serving time for best texture.
- → What tools are necessary for decorating the cake?
Use piping bags with decorative tips, an offset spatula for smooth frosting, and optional edible decorations like pearls or themed toppers.
- → How do I ensure even baking of the colored layers?
Bake layers in greased pans lined with parchment and test doneness with a toothpick before cooling on wire racks.